How To: Wacker Neuson WP1540 & WP1550 Drive Belt Replacement
Posted by David Schatz, Owner - DHS Equipment on Aug 27th 2014
How to Replace the Drive Belt on the Wacker Neuson WP1540 and WP1550 Plate Compactor
The Wacker Neuson WP1540 and WP1550 plate compactors are two of the most popular compactors on the jobsite. DHS Equipment understands the need for beneficial information on maintaining these compactors. One of most popular maintenance projects is replacing the WP1540 and WP1550 drive belt. The drive belt offered by DHS Equipment is a premium quality replacement, offering OEM standards for quality at an affordable price. Please view the instructions below on how to replace the drive belt on the WP1540 and WP1550 plate compactor.
Wacker Neuson WP1540 & WP1550 Drive Belt Removal
- Pivot guide handle forward.
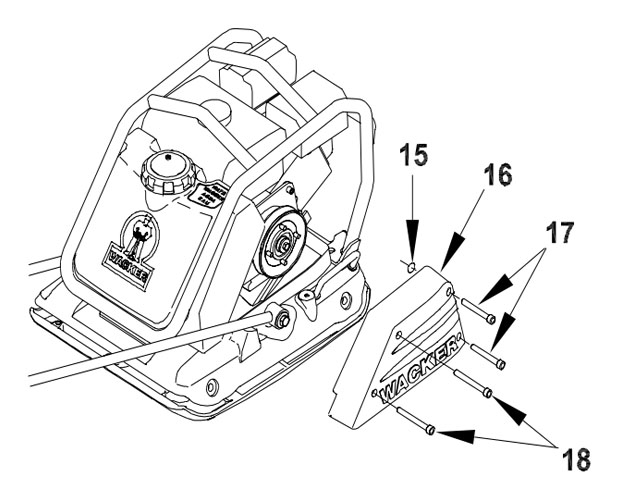
- Remove screws (17 and 18) to remove the belt guard cover. Rubber o-rings (15) will remain on the screws and keep them within the belt guard.
- Remove four nuts (a) and lock washers holding the pulley halves (b) and spacers (c) together.
- Remove the outer pulley half to remove the drive belt from the exciter puller and WP1550.

Wacker Neuson WP1540 & WP1550 Drive Belt Installation:
- Install new drive belt, part number 111158 on the exciter pulley.
- Install three spacers (c) and outer puller half with the drive belt between the pulley and pulley halves.
- Install lock washers and nuts (a). Tighten nuts to secure.
- Install belt guard cover and tighten screws to secure.
Wacker Neuson WP1540 & WP1550 Drive Belt Adjustment
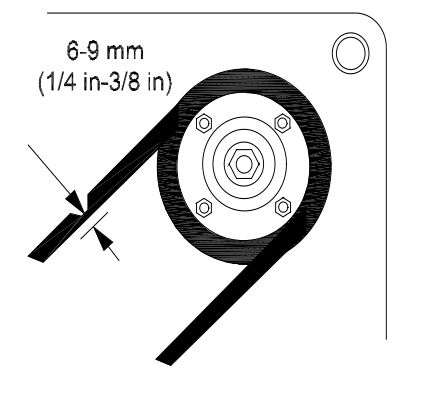
After the first 20 hours of operations, check the belt deflection. Drive belt deflection should be 6-9mm, or 1/4" to 3/8", half way between the clutch puller and the exciter pulley.
To increase drive belt tension, or reduce the amount of deflection:
- Remove screws (17 and 18) to remove the belt guard cover. Rubber o-rings (15) will remain on the screws and keep them within the belt guard.
- Remove four nuts (a) and lock washers. Remove the outer pulley half and one space.
- Install the outer pulley half, then the unused spacer. Secure with lock washers and nuts.
- Check drive belt deflection again. If necessary, remove another spacer from between the pulley halves and put the spacer on the outside of the pulley halves.
- Install belt guard cover and tighten screws to secure.
For information not covered in this how-to, please contact DHS Equipment toll free at 866-611-9369. Our expert Wacker Neuson parts team will assist you with your request.