Check oil level in control handle once a week or every 25 hours.
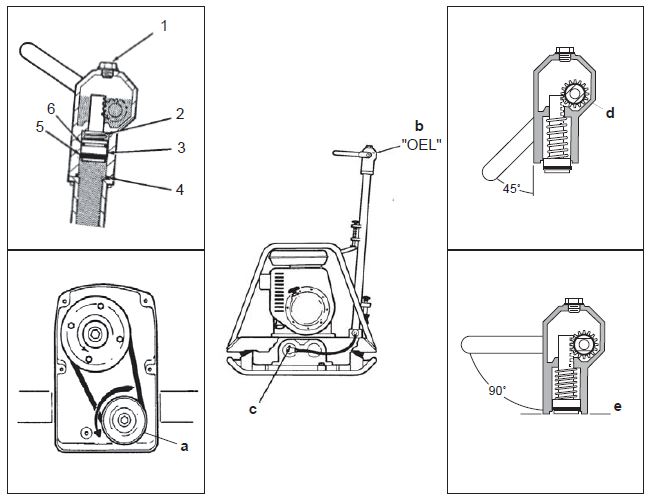
Remove plug from top of control handle. Add oil as required to maintain proper oil level. Oil level should be at “OEL” mark on outside of housing. If oil needs replenishing on a regular basis, it may be leaking past the seals on the pistons. Service the seals on the pistons.
A low oil level may allow air to enter the control circuit. This condition is normally characterized by the plate’s inability to travel in the forward direction. Should this occur, bleed the system.
Bleeding the control circuit oil:
- Bleed control circuit whenever handle or exciter have been opened for service
- Turn off engine before servicing
- Lock handle in its vertical upright position
- Remove belt guard to expose exciter pulley (a)
- Secure the control lever in the reverse position using a C-clamp to prevent the spring and piston inside from popping out when control assembly is removed. Remove control assembly from handle tube
- Fill handle tube with oil
- Remove bleeder screw (c) from cover flange on exciter
- Slowly rotate exciter pulley counterclockwise (same direction as normal operation) two full turns. Oil will flow out of bleeder hole during this procedure as the piston in the exciter extends and retracts inside flange cover
- Rotate exciter pulley to a position where oil is observed flowing from the hole and insert the bleed screw while holding the pulley in this position. This prevents air from being drawn back into the flange cover. Tighten the bleeder screw
- Top off oil in handle tube
- Make sure O-ring is in place between control assembly and tube flange and re-install control lever assembly. Coat bolts with Loctite 242 or equivalent and contact us for torque specifications
- Remove fill plug from control lever assembly and fill with oil to “OEL” mark (b). Do not overfill
- Wait 30 seconds for oil to fill area under piston, then remove C-clamp and re-install fill plug
- Start plate and check directional control
Re-installing the piston in the control assembly:
If it is ever necessary to re-install the piston into the control assembly, carry out the following procedure.
- Place the control lever in a position approximately 45° to the assembly body. Insert the piston assembly until the first groove in the piston catches on the pinion (d)
- Move the lever to a position 90° to the assembly body. The pinion should pull the piston into the assembly body as the lever is rotated. When the lever reaches the 90° position, the end of the piston must be flush with the opening in the assembly body (e). If it is not, repeat the procedure, repositioning the piston as needed.

Author: David Schatz
David Schatz is the founder of DHS Equipment and a technical content expert in light construction equipment, small engines, and professional-grade replacement parts. With more than 30 years of hands-on experience servicing concrete saws, generators, water pumps, and plate compactors, he helps contractors, rental fleets, and serious DIY users keep their equipment running safely and efficiently.
Through practical, no-nonsense articles, step-by-step guides, and maintenance tips, David focuses on real-world troubleshooting, small engine repair, and clear recommendations on OEM and high-quality aftermarket replacement components that reduce downtime, extend equipment life, and improve job site productivity.