


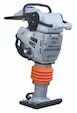

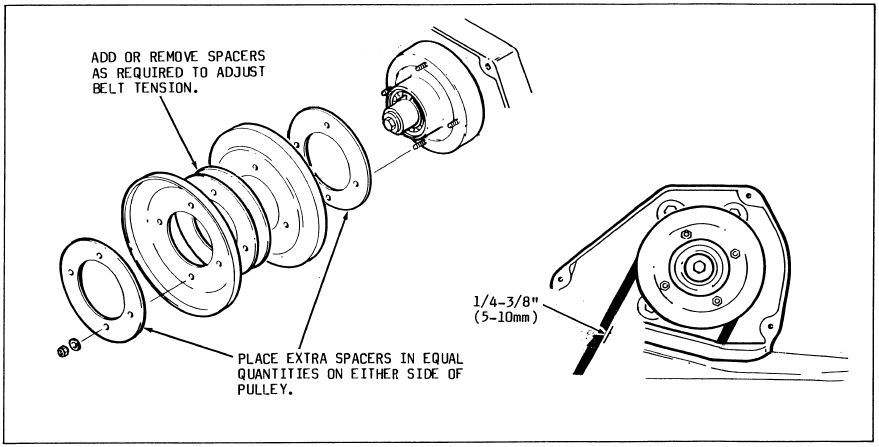
The Wacker BPU3545 drive belt should be inspected and/or adjusted weekly or after every 50 hours of operation. After installing a new belt on the Wacker BPU3545, check the belt tension after the first 25 hours of operation. Adjust the belt for 1/4"-3/8" deflection when pressed midway between the belt pulleys.
Adjusting the drive belt:
To tighten the belt reduce the quantity of spacers between pulley halves; to loosen the belt, add spacers.
- Remove belt cover
- Remove the four hex nuts holding the pulley halves together
- Remove the outer pulley half and remove the spacers as required to tighten the belt. Normally, removing one spacer is sufficient
- When installing a new belt, remove or add spacers as required to obtain correct belt tension
- Note: Place unused spacers in equal quantities on either side of the pulley to maintain belt alignment. If spacers cannot be placed equally, place the odd spacer to the outside of the pulley
- Secure pulley halves together with hex nuts and recheck the belt tension. Replace belt cover

Author: David Schatz
David Schatz is the founder of DHS Equipment and a technical content expert in light construction equipment, small engines, and professional-grade replacement parts. With more than 30 years of hands-on experience servicing concrete saws, generators, water pumps, and plate compactors, he helps contractors, rental fleets, and serious DIY users keep their equipment running safely and efficiently.
Through practical, no-nonsense articles, step-by-step guides, and maintenance tips, David focuses on real-world troubleshooting, small engine repair, and clear recommendations on OEM and high-quality aftermarket replacement components that reduce downtime, extend equipment life, and improve job site productivity.