


How-to: Wacker VP1340, VP1550, and VP2050 Clutch Service
Posted by David Schatz, Owner - DHS Equipment on Mar 28th 2017
The clutch on the Wacker VP1340, VP1550, and VP2050 is very simple to service, but requires Wacker's clutch removal tool, part number 0115008. This tool should be used to remove the clutch. We do not recommend any other method of removing the clutch.
Removal:
- Remove drive belt
- Remove screw (30) and washers (38) securing clutch (10) to engine shaft. Remove clutch from engine shaft using the clutch removal tool (4). Use care not to damage clutch during removal
- If necessary, remove screw (84) and washers (85, 40) to remove beltguard plate (7)
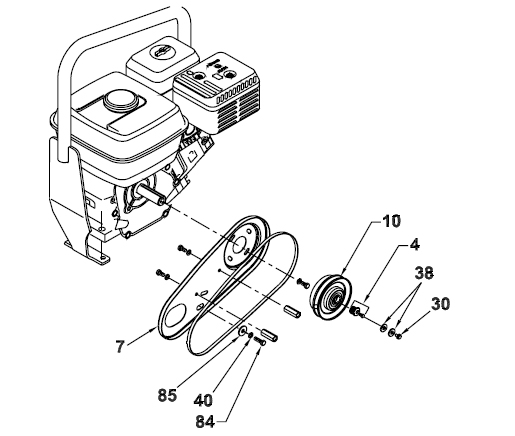
Installation:
- If removed, install beltguard plate (7) using washers (85, 40) and screw (84)
- Apply Loctite 242 to threads of screw (30). Secure clutch assembly (10) to engine shaft using washers (38) and screw (30). Tighten screw. Contact us for torque specifications
- Install drive belt and beltguard

Author: David Schatz
David Schatz is the founder of DHS Equipment and a technical content expert in light construction equipment, small engines, and professional-grade replacement parts. With more than 30 years of hands-on experience servicing concrete saws, generators, water pumps, and plate compactors, he helps contractors, rental fleets, and serious DIY users keep their equipment running safely and efficiently.
Through practical, no-nonsense articles, step-by-step guides, and maintenance tips, David focuses on real-world troubleshooting, small engine repair, and clear recommendations on OEM and high-quality aftermarket replacement components that reduce downtime, extend equipment life, and improve job site productivity.