


How-to: Wacker VP1340, VP1550 & VP2050 Belt Replacement
Posted by David Schatz, Owner - DHS Equipment on Mar 31st 2017
Replacing the belt on the Wacker VP1340, VP1550, and VP2050 plate compactor is a common task. We sell hundreds of belts per year, so we've added this how-to to help guide you while replacing the belt on your machine.
Removal:
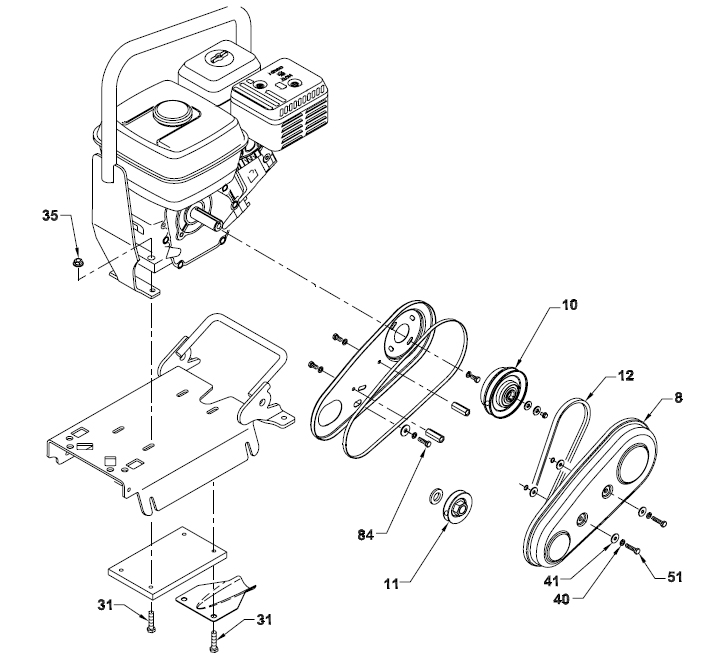
- Remove screws (51) and washers (40 and 41) to remove beltguard (8). Keep screws captive in the belt guard
- Loosen the four nuts (35) which hold the engine to the console, and the screw (84) which holds the belt guard back to the console
- Slide the engine forward to loosen the belt. Remove belt (12)
Installation:
- Install belt on exciter pulley
- Slide the engine backward (towards the handle) to tighten the belt
- Adjust the belt so that it deflects 6–8 mm (1/4–3/8 in.) when pressed midway between the belt pulleys
- Tighten the four nuts (35) which hold the engine to the console, and the screw (84) which holds the belt guard back to the console
- Make sure that the clutch pulley (10) and the exciter pulley (11) are in alignment. Place a straight edge against the exciter pulley (11) and move the engine so that the two pulleys are parallel
- Install screws (51) and washers (40 and 41) to reattach belt guard (8). Contact us for torque specifications
Adjustment:
On new machines or after installing a new belt, check the belt tension after first 20 hours of operation. Check and adjust the belt every 50 hours thereafter

Author: David Schatz
David Schatz is the founder of DHS Equipment and a technical content expert in light construction equipment, small engines, and professional-grade replacement parts. With more than 30 years of hands-on experience servicing concrete saws, generators, water pumps, and plate compactors, he helps contractors, rental fleets, and serious DIY users keep their equipment running safely and efficiently.
Through practical, no-nonsense articles, step-by-step guides, and maintenance tips, David focuses on real-world troubleshooting, small engine repair, and clear recommendations on OEM and high-quality aftermarket replacement components that reduce downtime, extend equipment life, and improve job site productivity.