The drive belt on the Wacker BPU2440 and BPU2950 should be inspected after every 25 hours of operation. New drive belts should be inspected after just 5 hours of service. On the Wacker BPU2440 and BPU2950, drive belt tension and quality is considered vital for proper machine function.
For this service, you'll need a 6mm allen wrench and a 13mm socket wrench.
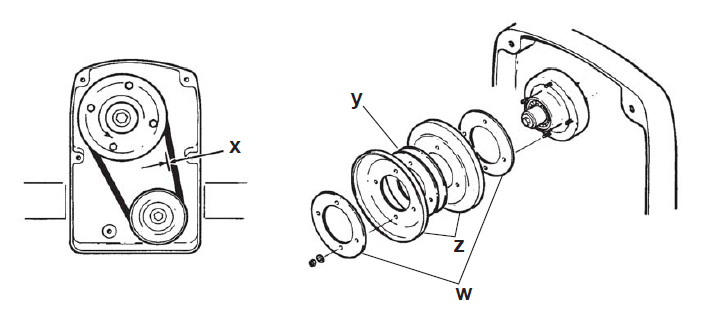
- Adjust belt for 1/4"–3/8" (5–10 mm) deflection when pressed midway between the belt pulleys (x)
- To tighten the belt, reduce the quantity of spacers (y) between the pulley halves (z); to loosen, add spacers
- Remove belt cover
- Remove the four hex nuts holding the pulley halves together
- Remove the outer pulley half and remove spacers as required to tighten the belt. Normally, removing one spacer is sufficient. When installing a new belt, remove or add spacers as required to obtain correct belt tension
- Note: Place used spacers in equal quantities on either side of the pulley to maintain belt alignment. If spacers cannot be placed equally, place odd spacer to the outside of pulley
- Secure pulley halves together with hex nuts and recheck belt tension
- Replace belt cover

Author: David Schatz
David Schatz is the founder of DHS Equipment and a technical content expert in light construction equipment, small engines, and professional-grade replacement parts. With more than 30 years of hands-on experience servicing concrete saws, generators, water pumps, and plate compactors, he helps contractors, rental fleets, and serious DIY users keep their equipment running safely and efficiently.
Through practical, no-nonsense articles, step-by-step guides, and maintenance tips, David focuses on real-world troubleshooting, small engine repair, and clear recommendations on OEM and high-quality aftermarket replacement components that reduce downtime, extend equipment life, and improve job site productivity.