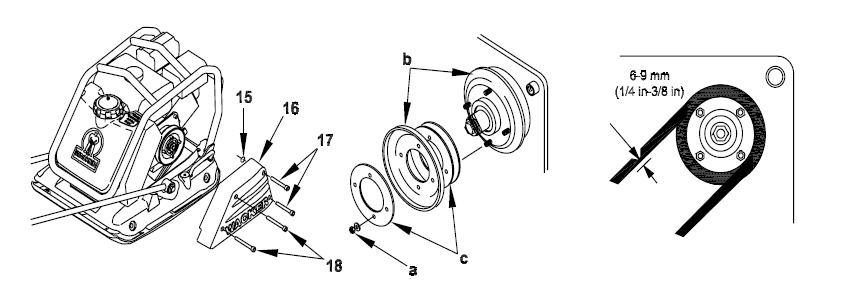
The drive belt on the Wacker WP1540 and WP1550 should be inspected every 2 weeks or after every 50 hours of operation. Proper deflection of the drive belt is between 1/4"-3/8", halfway between the pulleys. If you have more than 3/8" deflection, check your shockmounts for wear or damage before adjusting the clutch or replacing the drive belt.
Removal:
- Pivot guide handle forward
- Remove screws (17 and 18) to remove beltguard (16). O-rings (15) will remain on screws, and keep screws captive in the belt guard
- Remove four nuts (a) and lock washers holding pulley halves (b) and spacers (c) together
- Remove outer pulley half to remove drive belt from exciter pulley and machine
Installation:
- Install belt on exciter pulley
- Install three spacers (c) and outer pulley half with belt between pulley halves (b)
- Install lock washers and nuts (a). Tighten nuts securely
- Pivot guide handle rearward to operating position
Adjustment:
- After the first 20 hours of use, check belt deflection. Drive belt deflection should be 6–9 mm (1/4 to 3/8 in.) half way between the clutch pulley and the exciter pulley
- Two or three spacers with new factory belts should provide the correct tension
To increase belt tension (reduce amount of deflection):
- Remove nuts (a) and lock washers. Remove outer pulley half and one spacer
- Install outer pulley half, then the unused spacer. Secure with lock washers and nuts (a)
- Check belt deflection again. If necessary, remove another spacer from between pulley halves and put outside of pulley halves
- Install belt guard

Author: David Schatz
David Schatz is the founder of DHS Equipment and a technical content expert in light construction equipment, small engines, and professional-grade replacement parts. With more than 30 years of hands-on experience servicing concrete saws, generators, water pumps, and plate compactors, he helps contractors, rental fleets, and serious DIY users keep their equipment running safely and efficiently.
Through practical, no-nonsense articles, step-by-step guides, and maintenance tips, David focuses on real-world troubleshooting, small engine repair, and clear recommendations on OEM and high-quality aftermarket replacement components that reduce downtime, extend equipment life, and improve job site productivity.