How-to: Wacker WP1540 & WP1550 Exciter Service
Posted by David Schatz, Owner - DHS Equipment on Mar 27th 2017
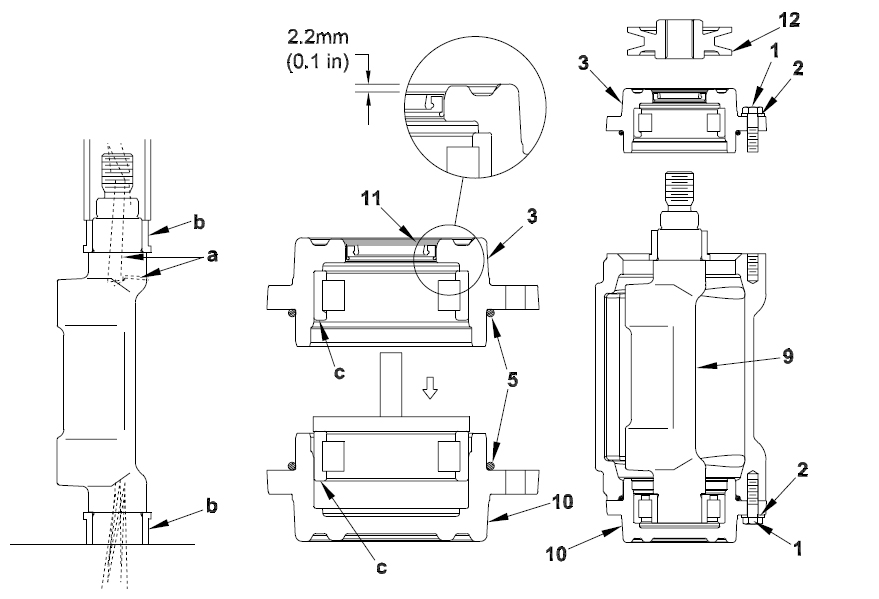
The exciter is the mechanism that creates the vibration in the Wacker WP1540 and WP1550. Inside the exciter housing, there are two bearings inside bearing holders and an exciter shaft. The exciter housing is sealed with two o-rings, with one on each bearing holder and a shaft seal on the bearing holder with a hole.
Removal of the exciter housing from the baseplate should only be done in the event that the exciter housing is damaged. Routine maintenance does not require removal.
- Remove the drive belt
- Wacker WP1540 and WP1550's with a water system requires the disconnection of the hose from the water tank
- Remove the four screws securing the console assembly to the baseplate and lift the console away from the baseplate. Note: A heat source will be necessary to loosen Loctite on screws
- Note: Pulley threads are left hand threads
- Remove the exciter pulley (12) using a 1-1/4" socket
- Note: If pulley does not loosen from shaft at this point, remove the shaft assembly and the housing and then remove pulley
- Caution: Exciter shaft is not retained at pulley end, the shaft can fall from the housing when the bearing holder is removed.
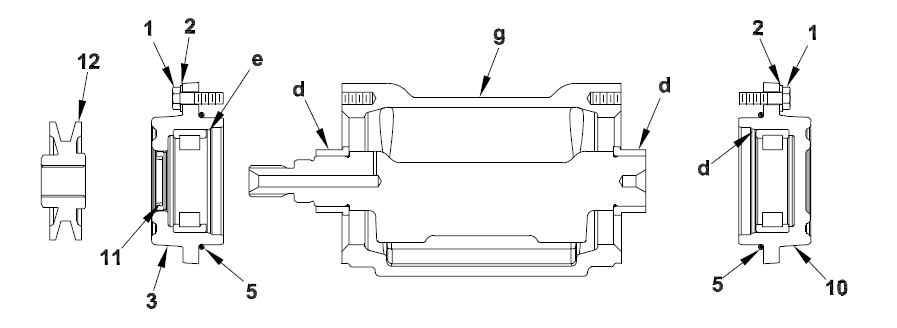
- Remove the three M8 screws (1) and washers (2) securing the bearing holder and drain the exciter oil
- Remove the exciter shaft (9) with the inner roller bearing races (d)
- Remove the M8 screws (1) and washers (2) securing the shaft-end bearing holder (10) and remove holder
- Note: Keep outer and inner bearing races together as matched sets and replace them as sets
- Remove roller bearings from outer races (e) and o-rings (5) from the bearing holders (3 and 10) using a bearing puller tool
- Remove bearing inner races (d) using a bearing puller tool
- Note: It is only necessary to remove inner races if bearing is being replaced. Heat inner races to aid removal. If the bearing is not being replaced, be sure to match inner races with mating outer races during assembly
Reassembly of the exciter components:
- Clean the inside of the exciter housing and bearing housings thoroughly. Make sure vent passage (a) in shaft is free of any obstruction
- If replacing bearings, use an appropriate size and length of pipe to press new inner races (b) onto exciter shaft as shown
- Note: Keep outer and inner bearing races together as a set
- Apply automatic transmission fluid to outer bearing races (c). Use an appropriate size disk from bearing and seal driver set to press outer bearing races (c) into bearing holders (3 and 10)
- Install seal in bearing holder (3) approximately 2.5 mm (0.1 in.) below top of bore
- Note: Lips of seal should be towards roller bearing
- Apply petroleum jelly to O-rings (5) and seal lips. Install O-rings on bearing holders
- Apply Loctite 243 or equivalent to threads of three M8 screws (1) and to screw holes. Install bearing holder (10) without hole using screws (1) and washers (2). Contact us for torque specifications
- Put the exciter assembly in a vertical position and install exciter shaft (9) into case
- Fill exciter with oil, before operating. Contact us for oil quantity and type
- Apply Loctite 243 or equivalent to threads of remaining three M8 screws (1) and to screw holes. Install bearing holder (3) with hole using screws (1) and washers (2). Use care not to damage seal lips
- Tighten screws to 30 Nm (22 ft.lbs.)
- Install exciter pulley onto shaft
- Note: Threads are left handed